


Fly tying procedure of my favorite and very effective universal wet fly in the traditional and popular form "Step By Step" photo gallery with a detailed description of individual steps and used fly tying materials!
For the continuation of my tying series "At the Vise", I have prepared a tying procedure for my original and favorite wet fly river pattern "AR Big Red Wet Mafly". When tying this fly, I can also remember my beginnings of fly fishing on running waters, during which I fished the first coarse fish and brown trout on this modest pattern prototype!
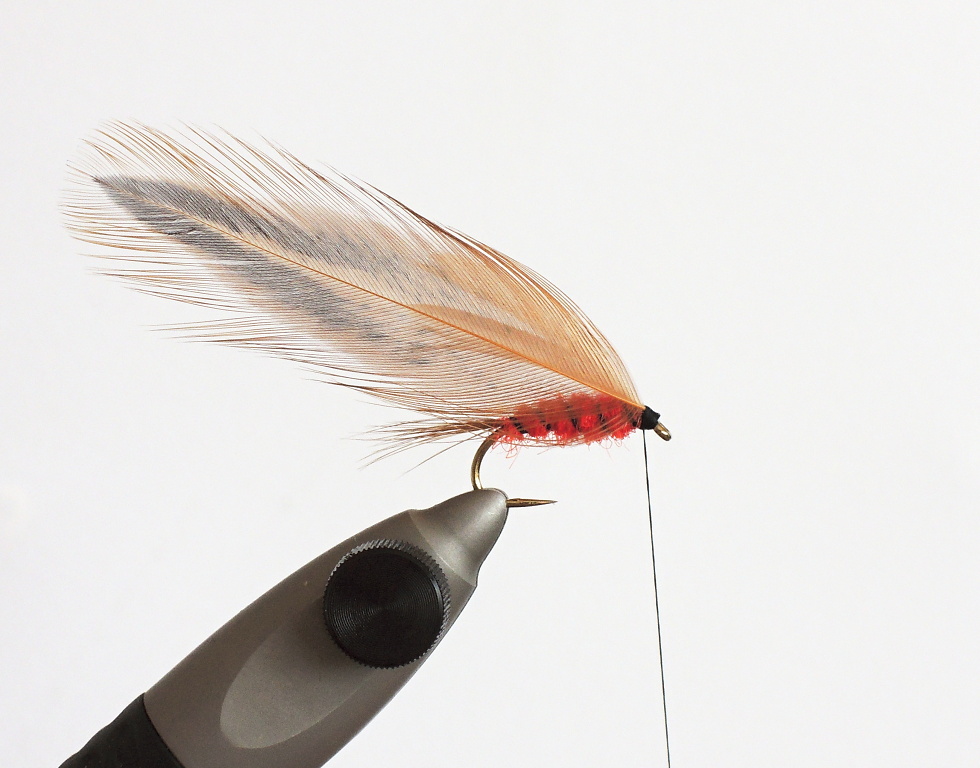
Historically, this my pattern - especially in size - was based on an insect that hatch over my favorite river (a red body mayfly and large yellow-beige Danicas in the spring), but I had to imitate it with the material which I had at the time available and which was not exactly much! And that's why I clamped a size 12 hook in the jaws of my primitive fly tyin spring vise and tied it with long fibers from the pheasant's tail feather like long tail, red cotton served as a distinctive body ribbed with thick black tying thread, white turkey feathers on distinctive large folded wings and for legs I used an excess of fibers from a pheasant tail. In the end, a big black head from a tying thread and an universal wet fly "killer" were born!
This mysterious and at the same time legendary pattern for me became my year-round favorite fly for many seasons and, for example, for the already mentioned coarse fish as a chub or trout, it was and still is a very effective fly. I remember exactly the day when I caught my very first nice brook trout from a non-trout river on this Big Red Wet ... Of course, my supply of fly tying materials and the variety of my fly tying techniques have expanded after these times, so I started to tie this pattern a little bit more deftly and with the help of higher quality and more suitable materials, which you will be able to see in the tying steps below individual photos.
The main use of this fly is in the classic wet way of fly fishing on the river, where this pattern in combination with wet March Brown for example, etc. is cast diagonally to the river bank and freely drifted is taken by chub, trout, but on larger coarse rivers also asp and big ide! With great success, I used the AR Big Red Wet Mafly several times in still water fly fishing, actively retrieved on an intermediate line, when it most likely imitate a small fish fry. So let's tie this universal wet fly together step by step with a detailed description of the individual operations and used fly tying materials! ;-)
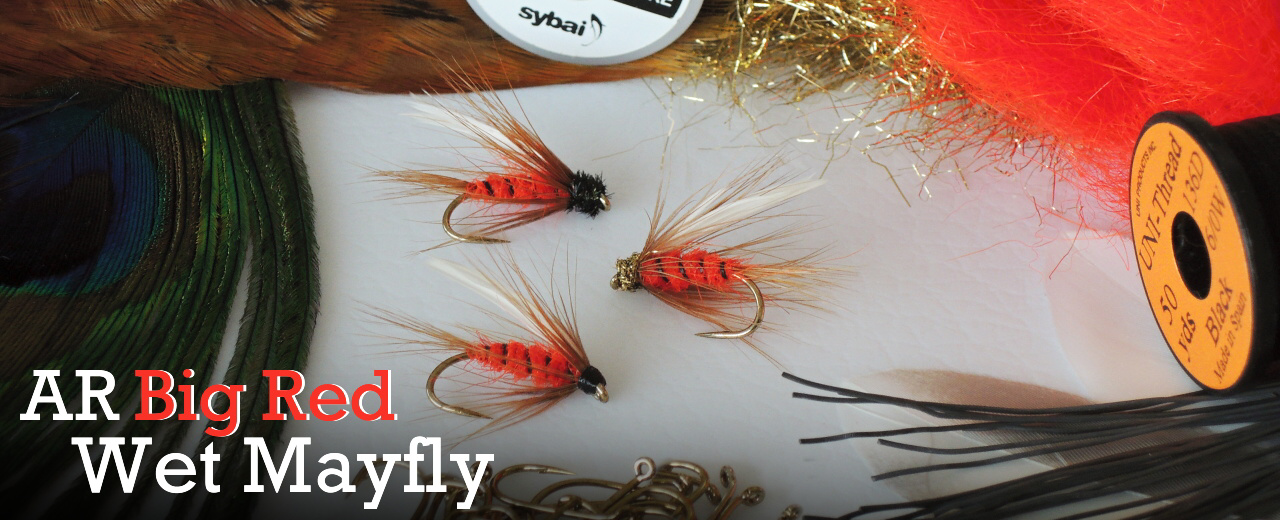
STEP 1: In the first step, we tie a black tying thread on a wet/lake Fly Tying Hook Fulling Mill Competition Heavyweight in sizes 10 - 12. In the first step, I always varnish the hook so that the tying thread adheres well to it, and as a result the fly has a solid base and a longer service life than flies whose are tied with no varnish! Next, we tie a bunch of soft fibers from a brown hen (formerly rays from a pheasant tail feather) to the base prepared in this way. Hen feathers have the advantage of being much softer than roosters, so they work great in water and give our flies more "naturalness" than rooster feathers (I only use them when tying dry flies) and longevity than feathers from pheasant tail, which is a little bit fragile.

STEP 2: In this step, it's time to load the fly, which we secure by adding a piece of lead wire along the length of the hook shank, or only a thicker colored ribbing wire will suffice, the tying of which is also part of this step. As you can see, in this case I tied both to the hook shank , but it's up to you how much you want the fly to sink trough the water column. I like to fish with this pattern on a larger non-trout river, so I also load with lead wire, but on smaller rivers only ribbing wire is enough for the fly to be carried by the water column naturally like drowned insects. With a lead load, flies are a bit more robust, but in waters with a stronger and deeper current, where the fish are not directly below the surface as in a smaller type of running water, it is necessary!
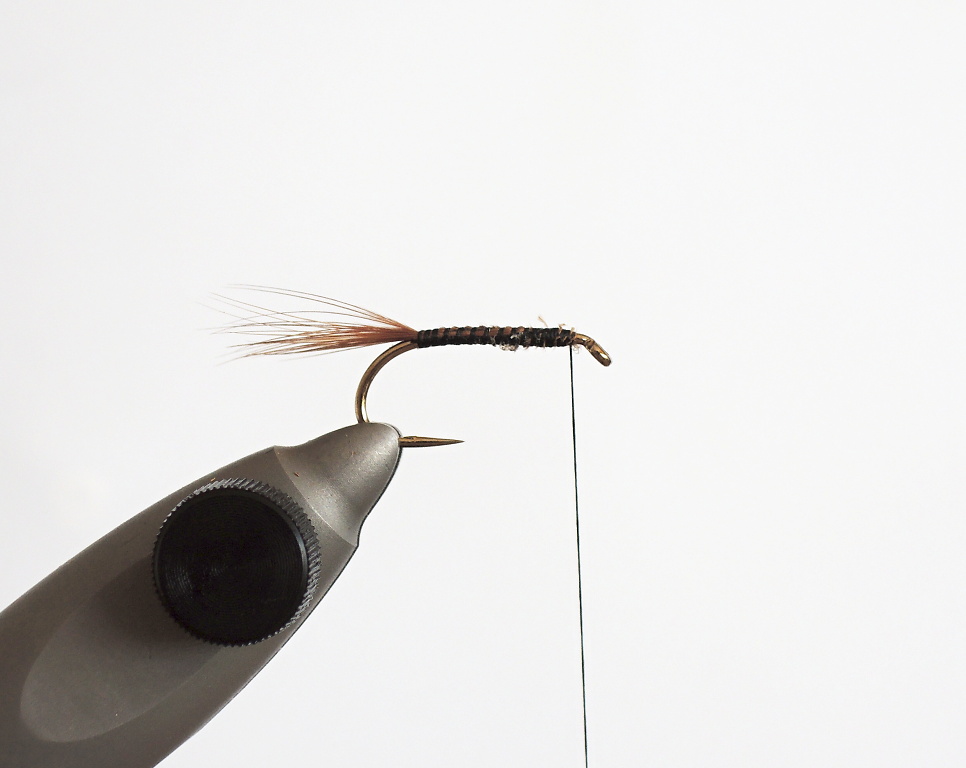
STEP 3: In the next phase, we will create a conical body from Genuine Seals Fur Dubbing Veniard in Hot Orange, or Bright Red, etc. I leave the exact shade on each fly tier. It is true that I tied this fly with a yellow, olive body or a completely black body, but the bright red variant is the most sympathetic to me, although the fish also reacted very positively to other colors and, for example, in a very muddy water, the variant with a black body is excellent! Do not overdo it with the amount of dubbing, unless you want to comb the body strongly in finish, which is ideal, for example, for the lake variants of this fly. Personally, I don't comb the wet wet flies too much, the fish will always adjust them to their ideal image over time! Finally, we firmly circle the conical red body with black wire or a solid flat tinsel in the amount of approx. 5 wraps.
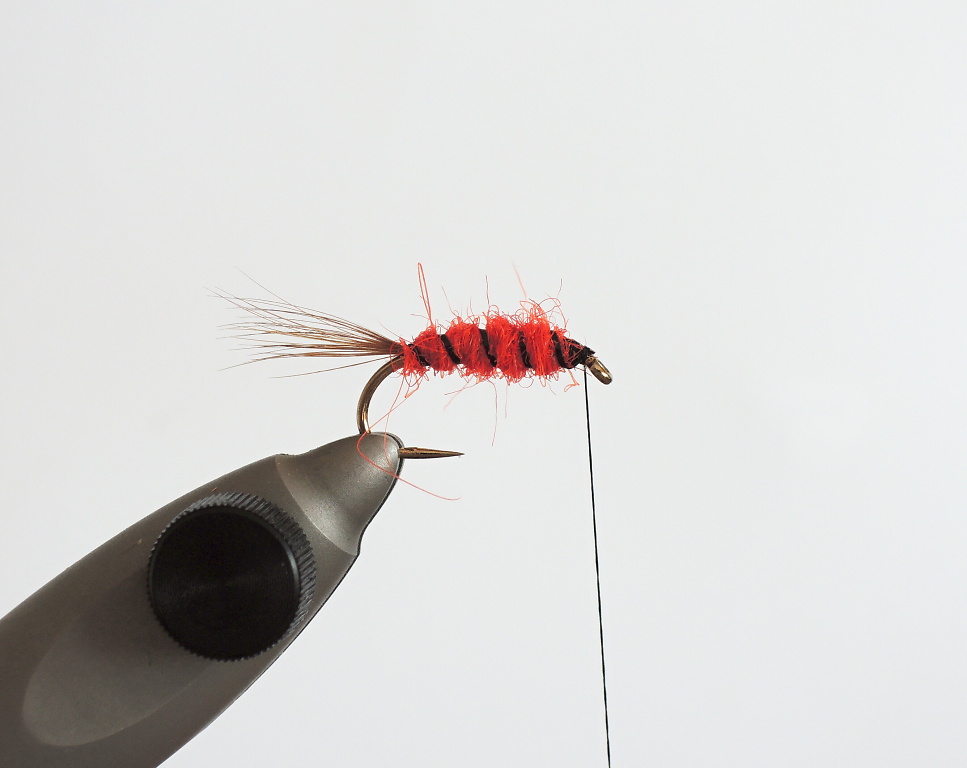
STEP 4: In the fourth step, a very important moment comes for some puritan fly tiers, which is the tying of perfect opposite wet wings. In my opinion, the result of this discipline will be appreciated perhaps only by similarly established "wet-fly tiers", who will - like the author himself - probably impress over perfectly tied wings of a wet fly, which in the mentioned TOP quality will last only the first caught fish. Unfortunately, the laboriousness of tying 100% wings and the precision of the fly fish does not solve so much and it will never be appreciated! ;-)
In the main principle, it is therefore important that each wing comes from the wing quills of the opposite wings (pigeon, duck, turkey, etc.). If the wings are not tied symmetrically, this can lead to an inadmissible rotation of the fly around its axis. All these aspects therefore led me to replace wet wings with such bundles of individual fibers, eg made of very soft hen feather in the required color, for lake wet patterns with "wings" I use Aero Dry Wing. The fly is just as effective and on the other hand I don't have to deal with its "damage" and bad movement.
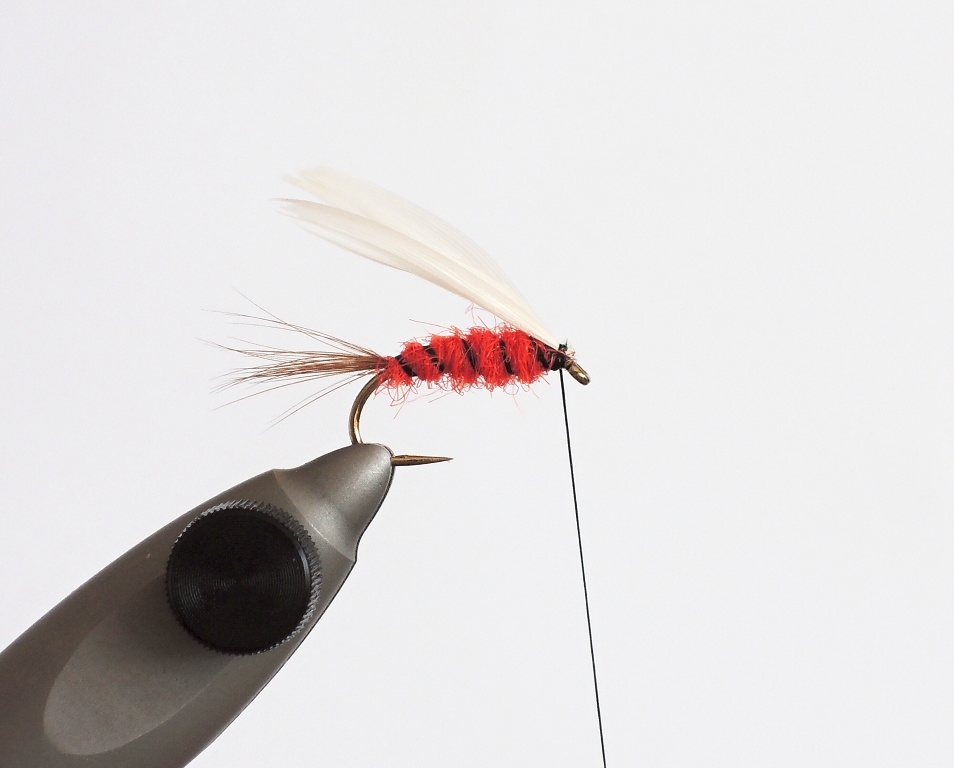
STEP 5: The moment we have the wings of our wet fly tied in the correct position and length in relation to fly body, it is time to attach a brown hen feather with sufficiently long individual fibers. If you use a feather with too short fibers, the resulting legs will be too thick and, most importantly, will protrude from the body. Therefore, I like to use such feathers that create the resulting legs about half the length of the tipet. Such legs then merge beautifully and adhere to the body. On the other hand, they are ideally soft and move in the water and enliven our fly, which is a factor that - in contrast to the perfection of symmetrical wings - fish definitely take into account! ;-)
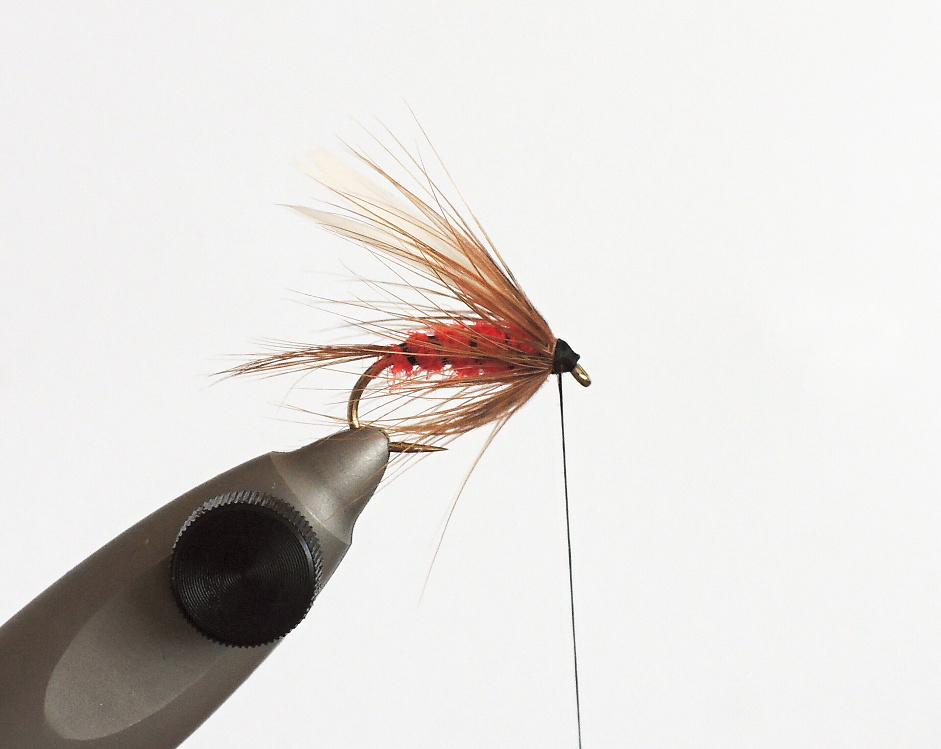
STEP 6: In the penultimate step, we create long fine legs of a fly made of brown hen feather with a dark center. Such feather then create an interesting effect and to some extent imitate a darker thorax, which turns into lighter and thinner legs of the fly - exactly as it is with real insects. At this stage, do not overdo it with the wraps of the crescent. 2 to 3 sparse wraps over the wings are fully sufficient. With more wraps, the legs would be too thick and less mobile. Definitely do not turn the feather under the white wings. This would lead to their uprighting, which is used when tying traditional winged dry flies. However, we do not need this effect with wet flies, on the contrary, we want to achieve a blunt impression of drowned insects with a subtle profile. Be sure to secure the feather well with the tying thread so that it does not unwind when you tear off / cut off the rest.
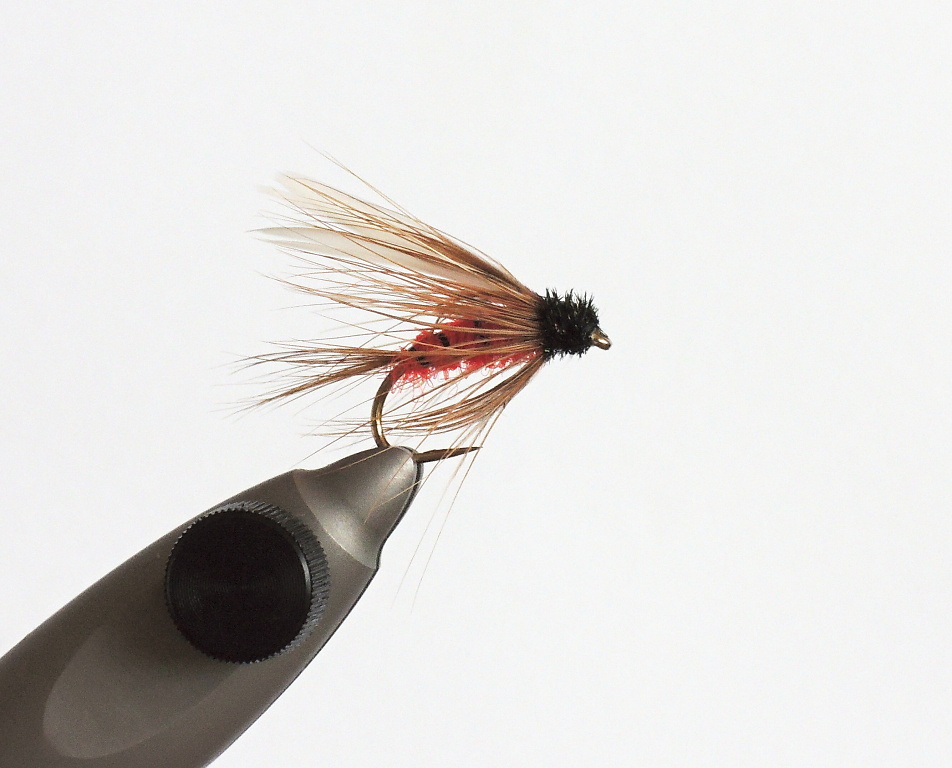
STEP 7: In the final step, it's time to create a head and a quality finish of the whole fly. I tied the original version only with a larger black head made of fly tying thread (you can see this variant in the introductory photo). Later, I started to improve the line and tie it with, among other things, more attractive heads. One of the variants is, for example, the creation of a larger "hairy" head from a peacock herl, as you can see in this photo or. dubbed heads from various Spectra and Holographic Dubbings or gold Metallic Dubbing (you can also see this variant in the introductory photo). There are many possibilities and, as is well known, there are no limits to imagination, in any case this wet fly pattern is traditionally effective even in the most basic form! In the end, only a few well-painted lost knots and the new AR Big Red Wet Mayfly is ready for the first voyage with a slow river stream! But hold the line tight, aggressive strikes from hungry fish will come soon!
CONCLUSION: Definitely try to follow this pattern with the help of my article and try hunting with it on running and standing water, as described! Frankly, this is probably the only red pattern I use when catching white and salmonid fish, and in my opinion, its effectiveness lies mainly in the use of individual contrasting elements - the fly is then clearly visible in clean and cloudy water and for fish in color very attractive. Don't be afraid to give up fishing with tungsten nymphs, especially on non-trout rivers, fish are active mainly in the column and below the surface during this period, and classic fishing with wet flies will bring you many unforgettable experiences with vigorous shots of active fish. upstream you can hardly wait!
I wish all the enthusiastic fly fishermen a lot of success and beautiful valuable catches, especially when fishing with a fly line! ;-) Aleš