


Fly tying procedure of my favorite and very effective still water buzzer pupa in the traditional and popular form "Step By Step" photo gallery with a detailed description of individual steps and used fly tying materials!
For a new article from the popular series "At The Vice" I prepared the fly tying procedure of my TOP natural stillwater nymph AR Holo Cheek Olive Seal Buzzer! Again, this is my original and very old fly pattern, which I have innovated a bit in recent years, but its history dates back to the years when I started with it with great success to fish brown, rainbow and brook trout on my favorite clear water trout reservoirs!
I do not know why, but traditionally I stopped using this fly completely after some time, but thanks to my old fishing diary, which I regularly kept as an action young fly fisher, I remembered this pattern, started using it again and included it in my stable arsenal of lake flies. AR Holo Cheek Olive Seal Buzzer is a very effective imitation of the olive buzzer pupa, but in larger sizes it can also imitate as a caddis pupa - I have been fishing with it several times during a massive hatching of caddis.
The main use of this pattern is mainly on natural still waters such as just mentioned trout reservoirs, mountain dams and lakes! So let's tie this great lake fly Step by Step with a detailed description of the individual operations and used tying materials! ;-)
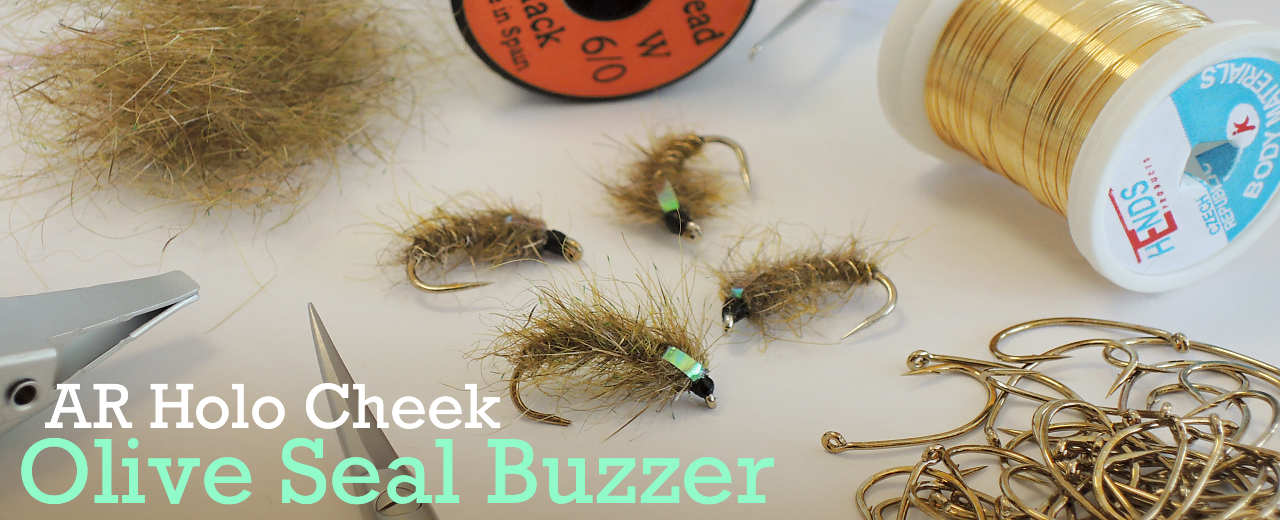
STEP 1: In the first step, we tie a black tying thread on the Fly Tying Hook Fulling Mill Super Grub. I always paint the hook with varnish so that the tying thread adheres well to hook shank and as a result the fly has a stable base and a longer life than flies whose are tied with no varnish! We attach Color Wire Hends 0,14 mm in gold color to the base prepared in this way, which will serve as an excellent strengthening element of the whole fly + regular golden wraps act in the water as small reflections of the sun's rays, which of course makes the fly visible and is therefore for fish often much more attractive than, for example, when using a fishing line for ribbing!
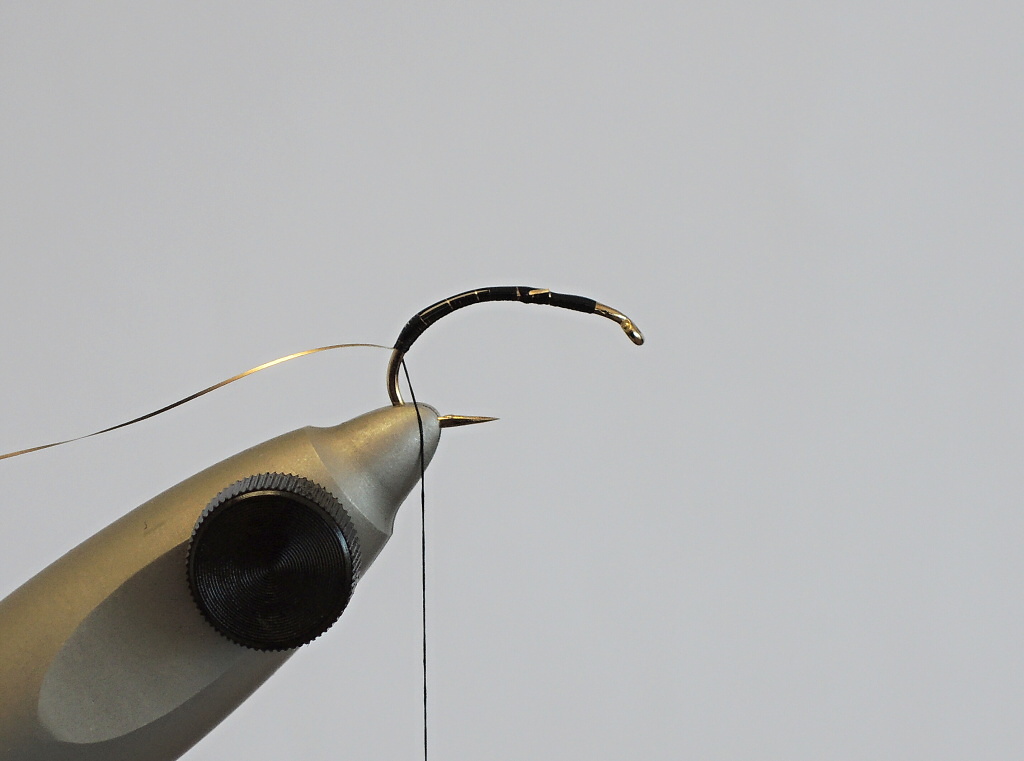
STEP 2: In the next phase, we make a thin but very coarse body with a mixture of seals fur and dubbing from the Hare Mask Veniard. I use seal fur in 2 olive shades in dark olive and golden olive. My favorites include Genuine Seals Fur Dubbing Veniard or Seal Dubbing Hends, whose quality and color fastness is absolutely excellent! Mix the mixture of seal dubbings with hare's fur well and make sure that the resulting color shade suits you! If different colored spots appear on the fly, the mixture was not sufficiently mixed.
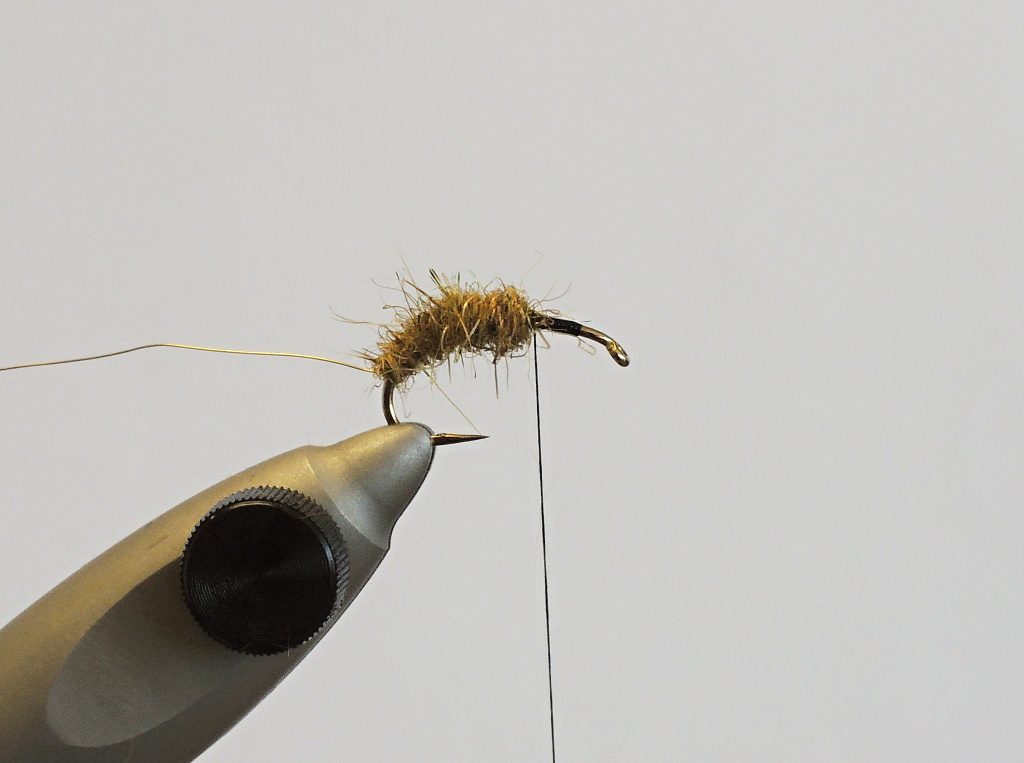
STEP 3: After creating a thin coarse body, it is time to ribbing with a golden wire. Ribbing can be done in the same direction as the body was dubbed or against the body wound direction, which strengthens the fly much better than in the first case! Personally, I make about 5 - 6 wraps for buzzer flies of a similar type, but if you want to have the body more ribbed, reinforced and more loaded at the same time, you can ring the body in narrower wraps even with a stronger wire. Or. it is possible to ring with a flat gold tinsel or a flat wire.
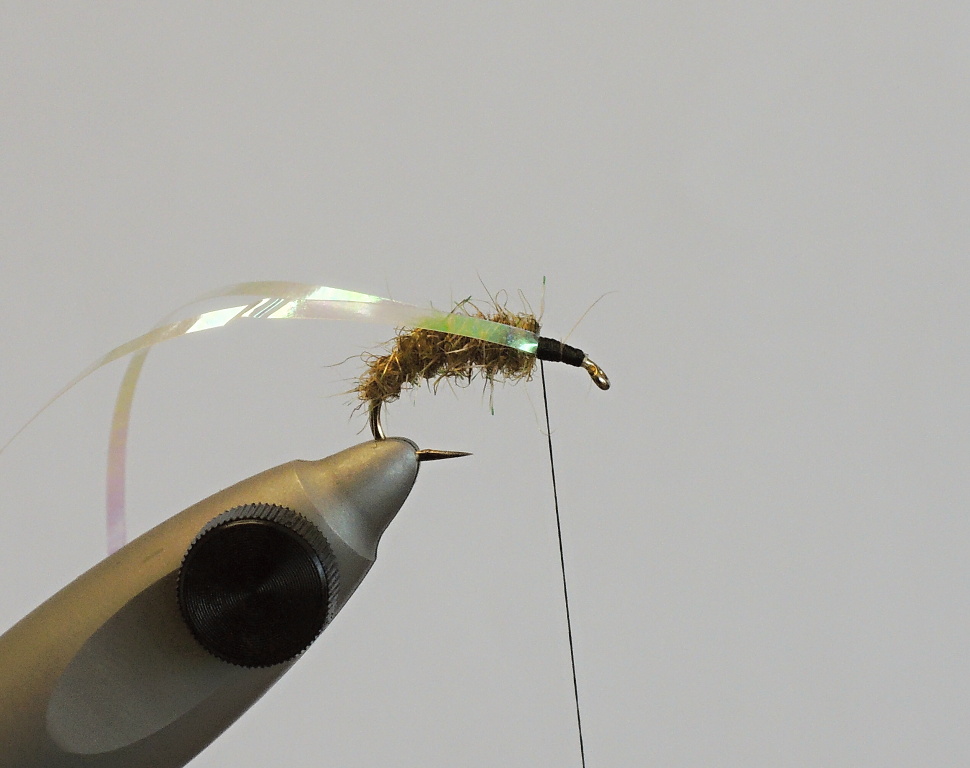
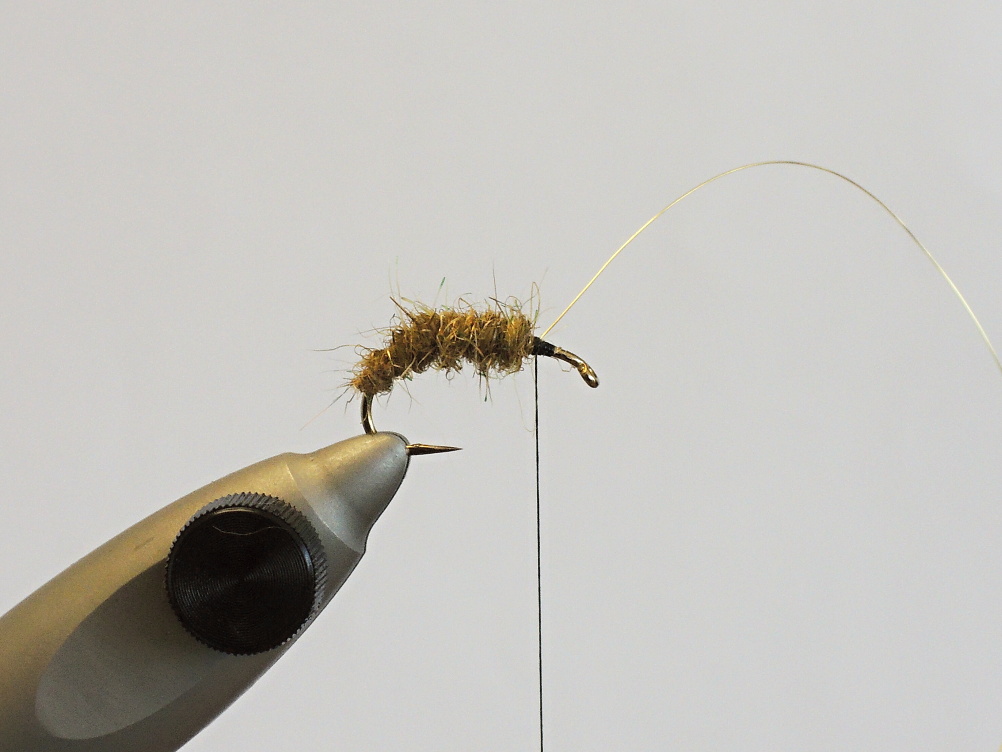
STEP 4: As soon as we ribbed the body, which - as you can see in the photo - reaches about 3/4 of the hook, fix the ribbing wire with the tying thread, cut it off and tie on both sides a stronger holographic tinsel with a greenish-pink shine. A few years ago I used a classic silver holographic tinsel and tuned the whole fly more into a beige shade, which was also a great option. Over time, however, I began to tie this pattern in this colored style, where I really like the multicolored effect of the tinsel with an olive roughly combed body. Occasionally the fish will damage the cheek. Occasionally the fish will damage the cheek. In that case, I cut the tinsel on the sides, comb the chest with velcro on the sides and continue fishing with the fly. If the fish tastes good, they don't mind the absence of shiny cheeks! :-)
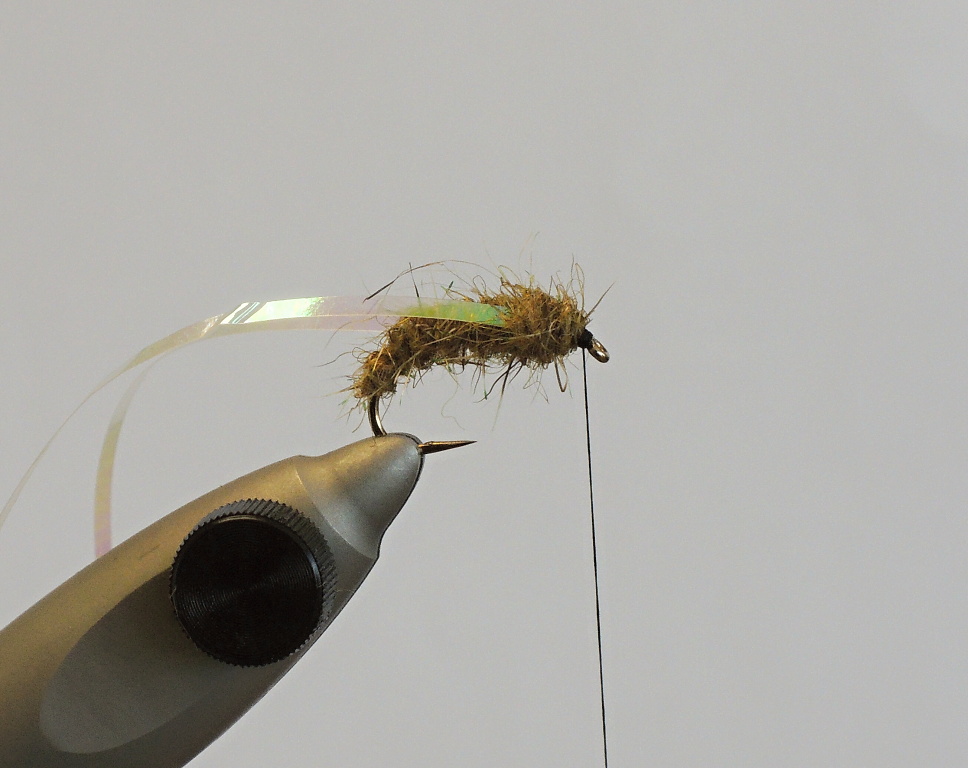
STEP 5: In the fifth step, we tie a stronger thorax from the same material that we created the body of the fly. Previously, I tried darker thorax, but I admit that it is unnecessary, and I also thought that the fly is much more effective in one colored shade. The strength of this pattern is precisely its simplicity. In clear water, the fish needs basically no significant element, on the contrary! Most of the time, smaller natural patterns are much better for clean still waters, which look very natural and there is nothing about them that the fish would not know and it caused its distrust in our imitation. I think all the elements on this fly are perfectly within the stated requirements for a great lake pattern in clear water!
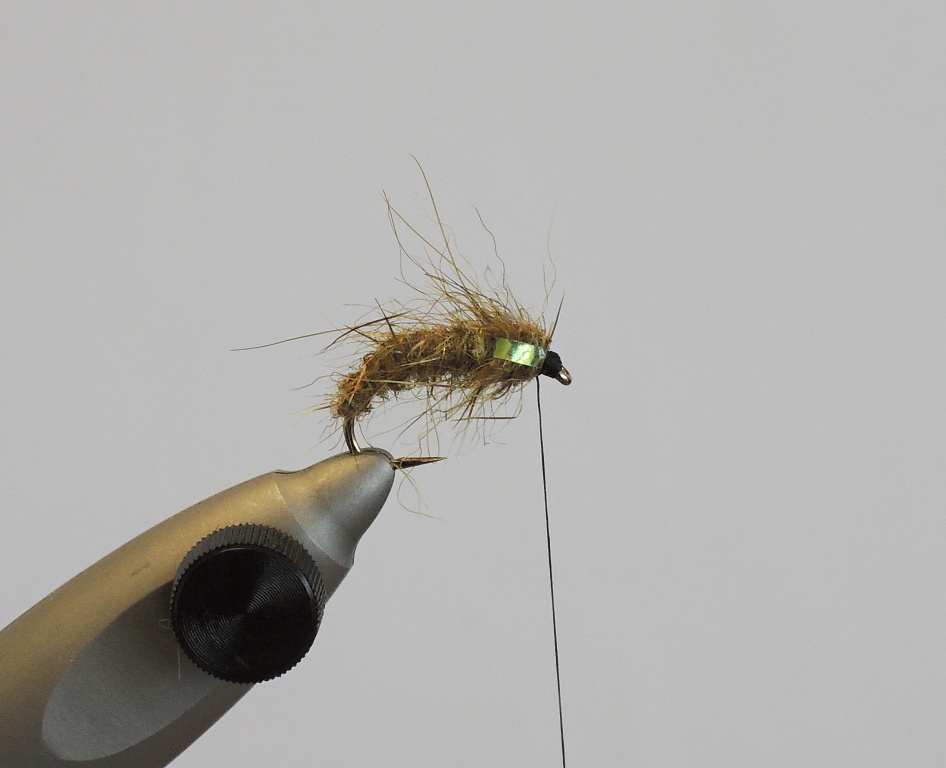
STEP 6: Before creating effective cheeks from the tinsel, lightly comb the thorax of the fly on both sides with Velcro and only then pull the tinsel over it, which must fix with a tying thread. If we do not comb the chest before, the cheeks can loosen after the final thorax combing - they will not be close enough to the sides of the thorax and will be more quickly damaged by the small sharp teeth of stillwater trout! Once the stems are firmly pulled and fixed on both sides, we can cut them off and continue tying the small black head.
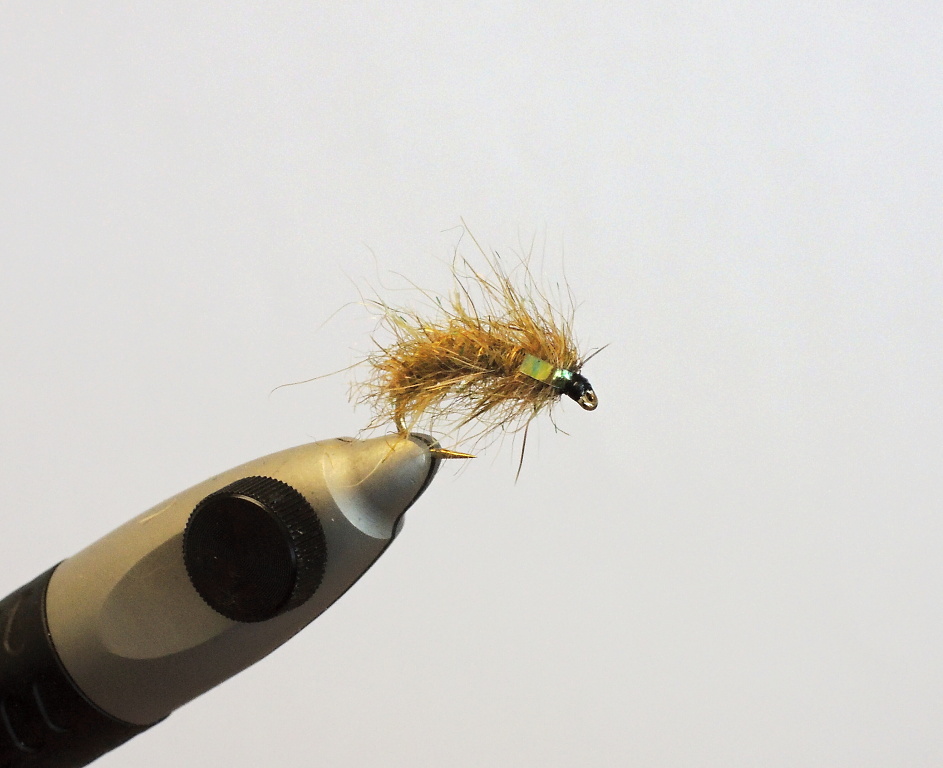
STEP 7: In the final step, we create a small black head from the tying thread, which we paint well on all sides with quality clear varnish - I like to use fly varnish with Brush Coat Varnish Veniard, which is very stable and does not turn white in water, which is not the case with some varnishes. The most important step is to properly comb the whole fly into a natural and attractive form for fish eye. I no longer use almost any other dubbing for lake flies than just made of seal fur, because it has a great structure and after its raw combing, the fly looks completely natural and absolutely irresistible!
CONCLUSION: If you are interested in this fly, be sure to try it with my instructions and description! What is interesting for me, for example, is that my favorite black color absolutely failedon this pattern, and therefore - before trying more color variants - I decided that flies that work for me in a given color and size, I will not develop unnecessarily in the next modifications. With such an approach, one makes the whole situation of fly selection much more complicated and confuses our head just by thinking and testing, rather than actively fishing and trusting to our choice! If you haven't set it up yet, try this approach too, because situations where fish require really subtle nuances are, but - in my experience - don't occur on the water so often that you have to have 10 color and size variations from each type of fly! There is power in simplicity and this also applies to the AR Holo Cheek Olive Seal Buzzer pattern... So try it! ;-)
I wish all the enthusiastic fly fishermen a lot of success and beautiful catches from their favorite waters! Aleš