


For many people parachute flies are difficult to tie. Strange as it may sound, in spite of the bad start with fly tying, I have never had any serious problems with producing a parachute...
For many people parachute flies are difficult to tie. Strange as it may sound, in spite of the bad start with fly tying, I have never had any serious problems with producing a parachute. Of course I had my difficulties tying off the parachute but that's quite normal, especially when you don't know the right technique. Once having found a good method, it can be tied as simply as any other dry fly. My greatest problem was that I was not satisfied with the securing and durability of the hackle. Although I fished intensively for grayling it sometimes happened that I hooked a trout. Those trout often destroyed the parachute during their fight for freedom. From that moment my interest in making more durable flies was a priority. It took me a whole winter season to find a technique that protected the hackle against those sharp little trout teeth. In this period of experiments and improvements I also looked for a much easier way to tie off the parachute hackle.
Because I used the normal parachute technique for only a very short time, I will pay not much attention to it. I will only can say that probably the most difficult step with parachutes is the securing of the hackle. This is because most people tie off the hackle at the eye of the hook. Using this method you have to pull away the hackle fibres first which makes the tie off very difficult. There are some special finger techniques possible to prevent this problem but I haven't seen many tiers using them. Although this is a solution to make the tying easier I still don't like it. It has no effect on the durability of the hackle. The hackle quill goes directly from the wing post to the hook eye, which makes it easily breakable by the sharp teeth of a trout. In my opinion it is a fragile construction because when the quill breaks, the parachute comes off very quickly. It happened to me quite often while using my first parachutes. During one of my first improvements I made some extra windings through the thorax before securing the hackle. This makes the hackle more durable, but also the tying more complicated.
TYING TIPS
The following style of dressing took me four months to develop and has been received enthusiastically whenever I have demonstrated it. I have no special name for it but I never saw anyone using this technique. I also can imagine that there have been fly tiers who used the same method with normal thread even a long time before I was born. New is probably my idea to use Danville's spiderweb to secure the hackle. My method has been designed to make winding a parachute a simple operation, while forming an effective, durable fly at the same time. I never say that this improved technique is the best, (which is Tomas Olson's melting techniques of course) but it is at any rate a very simple and quick method and I hope you will try it and form your own opinion. During classes and workshops I am able to teach my technique to all participants in less than one hour.
THE DRESSING OF THE KLINKHAMER SPECIAL
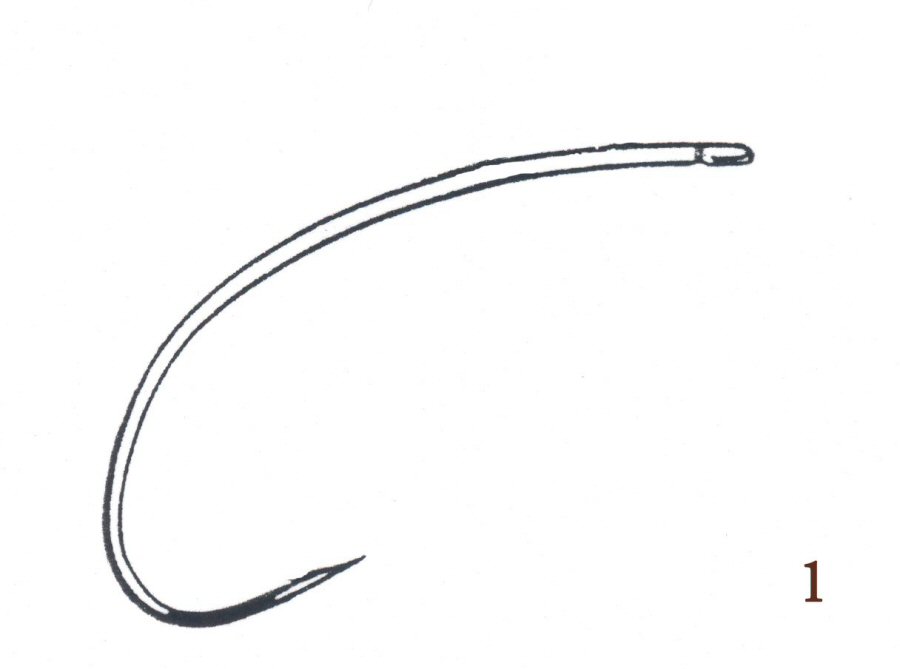
Hook: Partridge GRS15ST, size 8-10 for salmon and trout : Partridge CS54 size 6 for salmon
Thread: Uni-thread, 8/0, grey or tan for body : Spiderweb for parachute
Body: Light-tan poly 2 dubbing
Wing: One strand of white poly-yarn
Thorax: Three strands of peacock herl
Hackle: One large blue dun hackle
For flies tied on the CS 54 I double or triple the amount of Poly yarn, Peacock herl and the number of hackle windings.
THE TYING TECHNIQUE
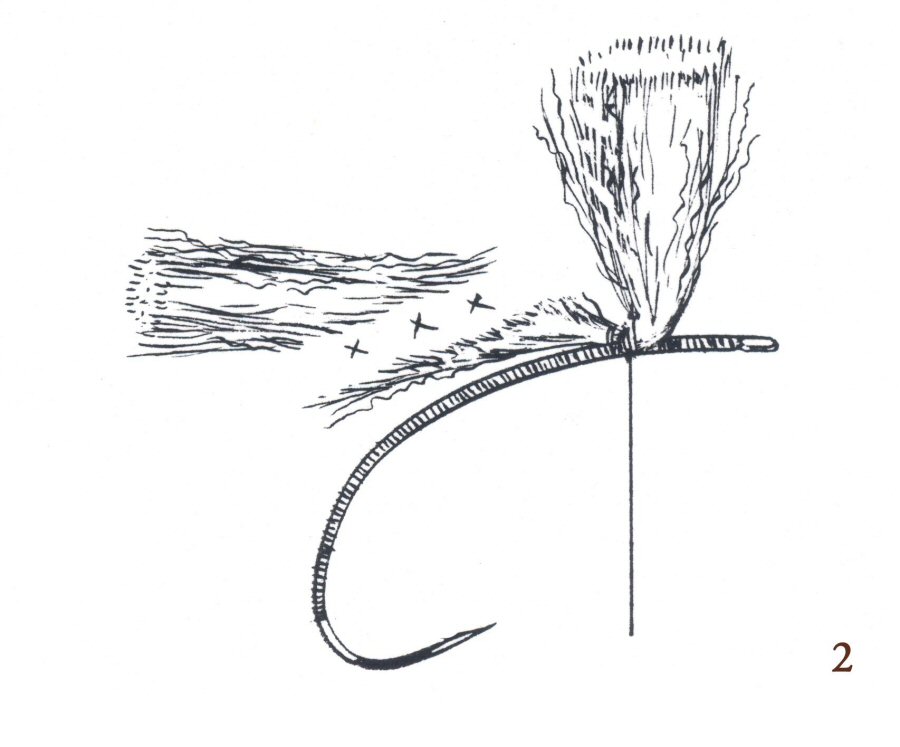
Step 1: For the CS54 it is necessary to reshape the hook between thumb and forefinger. Place the hook in the vice and wrap the entire shank with the tying thread. This avoids the difficulty of a slipping wing when the fly is finished. Cut off a strand of poly-yarn and taper the tip with your scissors before tying in; this is to be sure the underbody will be as slim as possible. Secure the yarn onto the top of the hook shank with the thread at the position shown in the drawing.
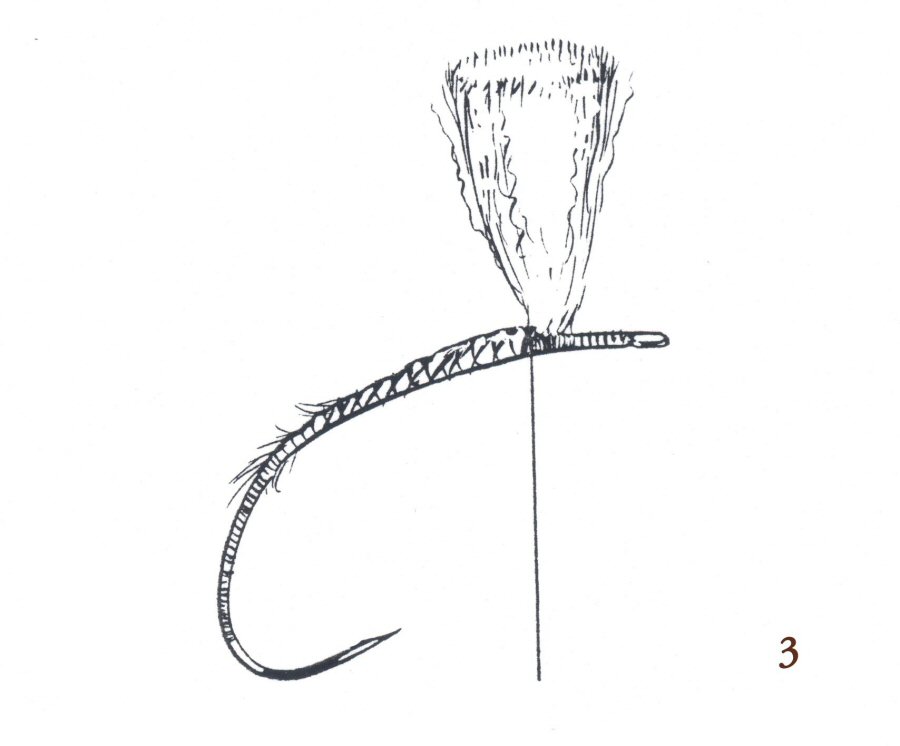
Step 2 & Step 3: Wrapping your thread down to the bend and backwards. Try to make a nice tapered underbody. I like a slim and well-tapered under body. Be very critical in this stage! The better the under body the more beautiful the completed fly.
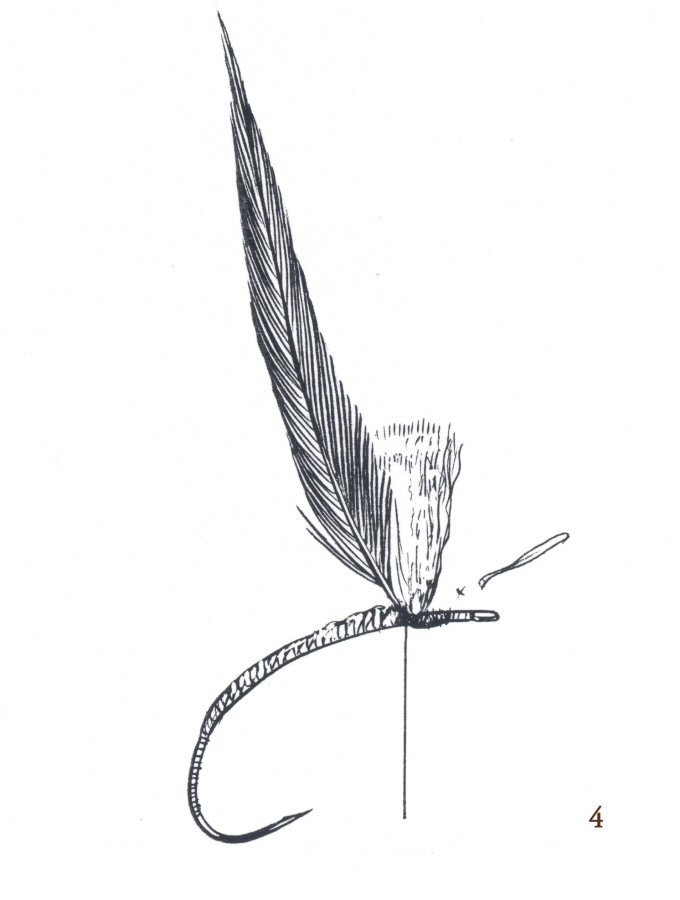
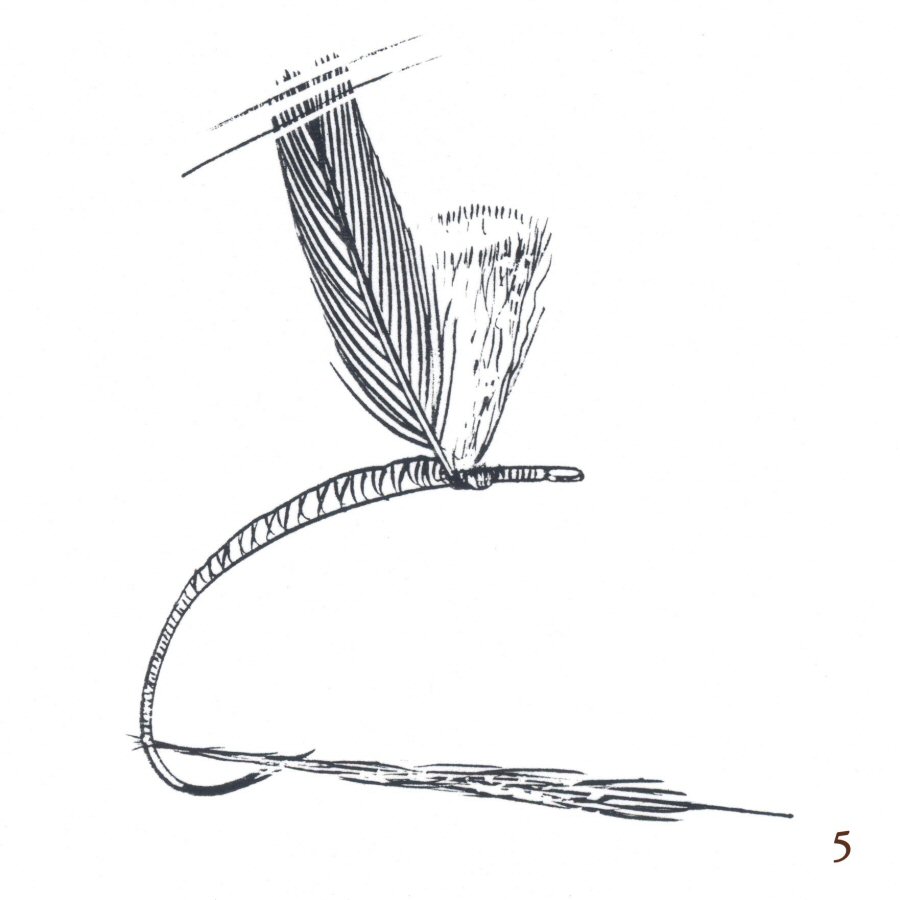
Step 4: Tie in the hackle so it lies in the same orientation as the yarn. Form an upright wing by tying up the yarn and hackle. (see drawing 2) This to be sure you have no problems with the hackle in the other tying steps.
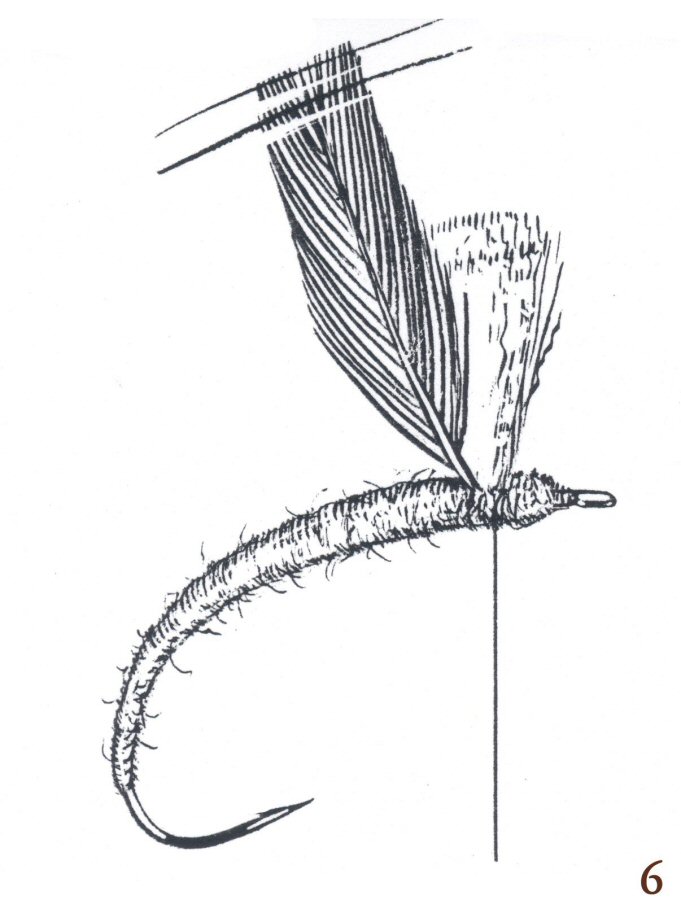
Step 5 & 6: Apply a small amount of dubbing to the thread. Take as much dubbing just to cover the under body. Tie the body very slim and well tapered. Start as close to the barb as possible. How thinner the body the more successful the pattern. Wind it along the shank and stop just behind the wing and cut off surplus poly or use the last piece of dubbing as underground for the thorax. In that situation it is not really necessary to cut off surplus. I recommend trying both techniques because for some people it is much easier to produce a better-looking thorax when you have made an under body.
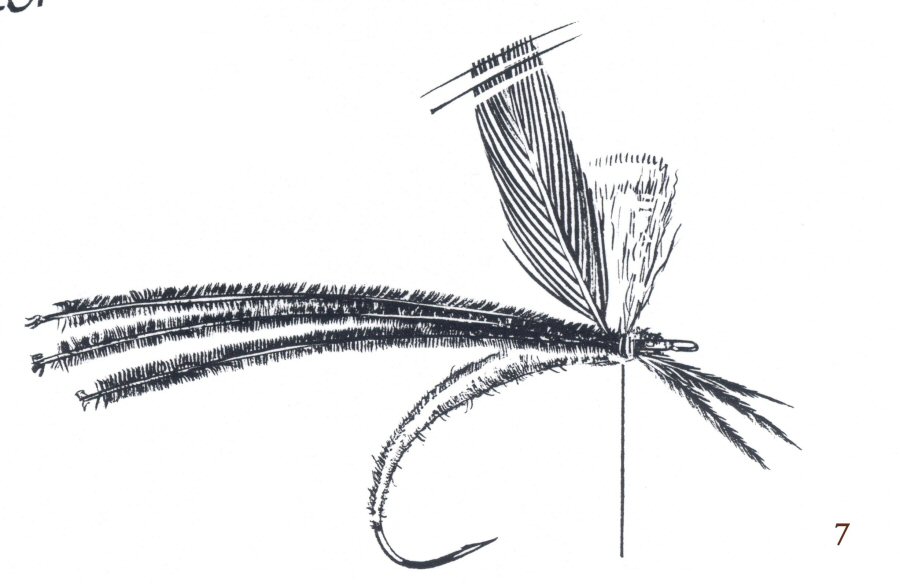
Step 7: Tie in three peacock herl fibres. You can also tie the strands in at their tips, this will help you to create a much nicer thorax. I secure the strands well also behind the wing. This provides that the thorax will come off.
Step 8: TIE OFF and varnish.
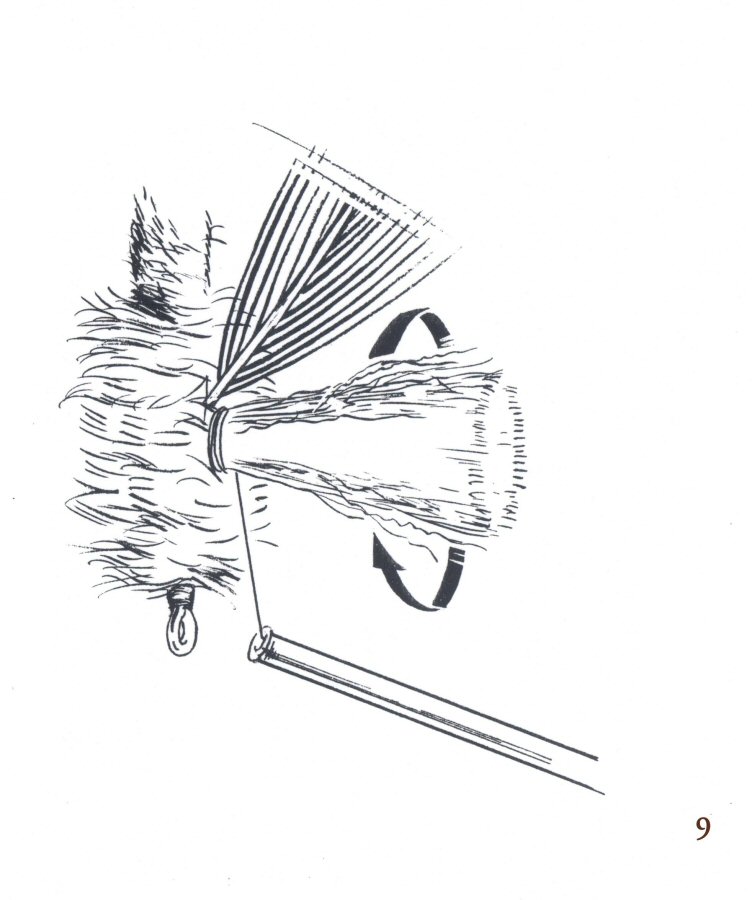
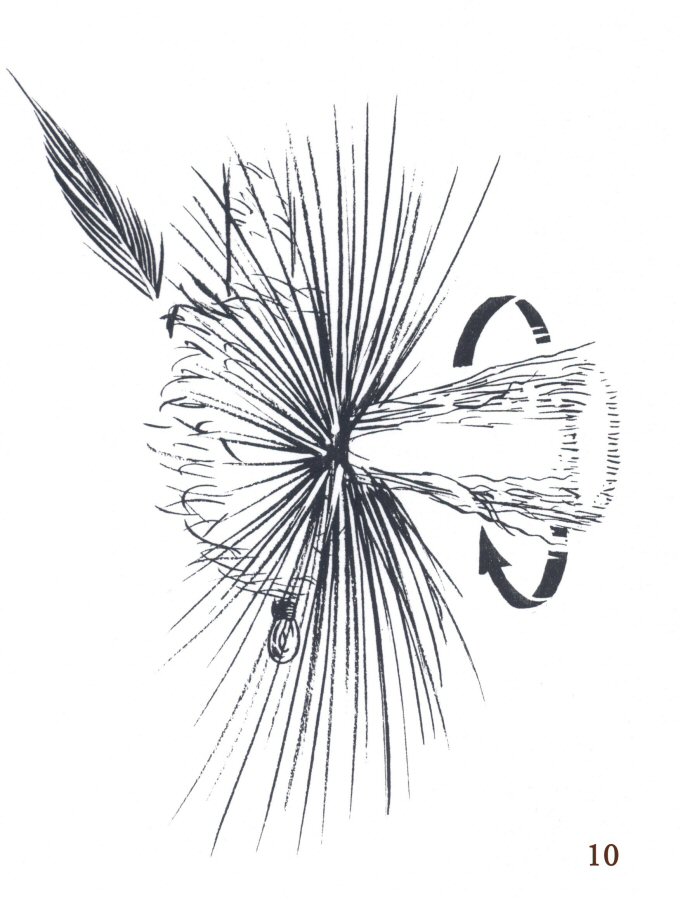
ATTENTION NOW TAKE YOUR BOBBIN WITH SPIDERWEB!!!!
Step 9 & 10: Now turn the hook in the vice, so that the wing is horizontal, with the bend uppermost. Grasping the tuft of poly-yarn, put on the spiderweb, wind several turns around the base of the poly-yarn and create a rigid wing base on which to wind the hackle. Wind the hackle around the base. Start at the top of your wing base, taking each successive turn closer to the hook shank. Take as many turns as the type of hook requires. Small flies about 5 windings and bigger flies at least 7 or 8 windings. Remember that the fly has to float mainly on the parachute. A lot of people wind their hackle in the opposite way, working up the wing, the hackle is less durable and may still come off. When you work from top downwards it ensures a compact well-compressed hackle and a most durable construction. Pulling the hackle tip to the opposite direction as the wing and secure with a few turns of spiderweb. Secure well around the base of the wing between the wound hackle and body. Using your whip finisher. Trim away the waste hackle tip and hackle fibres that are pointed down. Take your varnish applicator and apply some lacquer on the windings just under the parachute.
WHAT DO FISH TAKE THIS LARGE PARACHUTE FLY FOR?
I must confess that my entomology was just started to develop when I first developed the Klinkhåmer, and it was meant to be a copy of what I had found in the stomach of a good grayling which were caddis pupae right on the point of hatching. It was their curved body, which I tried to imitate with the grub hook. The emerging wings could be seen as the parachute hackle. This combination surely gave rise to the fly's appearance. Now, years later and with a reasonable knowledge of Scandinavian insect-life I misinterpreted the function of the fly. Today, I see my Klinkhamer not only as wonderfully effective fly or series of flies when the basic pattern is altered to accommodate emerging sedges, midges, upwing flies etc. but also as a perfect imitation for many different types of large struggling terrestrials. This is the only reason I can come up to take it even when there is no evidence of a hatch. In this instance, it makes a truly wonderful searching dry fly pattern.
SOME FISHING TIPS
I mainly fish and present my fly down streams. I have too many personal arguments to describe all the details but one of them is that I prefer a drift with the fly in front. I like to think as a fish and believe that many fish will refuse the fly because they simply discover the leader or shadow of the leader with upstream fishing. With very fine leaders it is not a real problem but with salmon fishing it is. This is what I discovered in Scandinavia and since I fish down streams the catches improved considerable. Although not many people like braided leaders I love them. Especially tapered intermediate ones. Because they give extra power and weight to the leader it prevents wind knots and produce better casting with large dry flies. To secure the leader to the fly line I push the leader over the fly line and tie it off with tying thread and a drop of waterproof superglue. It is a very smooth, durable and unbelievable strong connection and had never a snap. At the tip I make a loop on which I directly put on the tippet. With this technique I reduce the knots in the leader until a minimum.
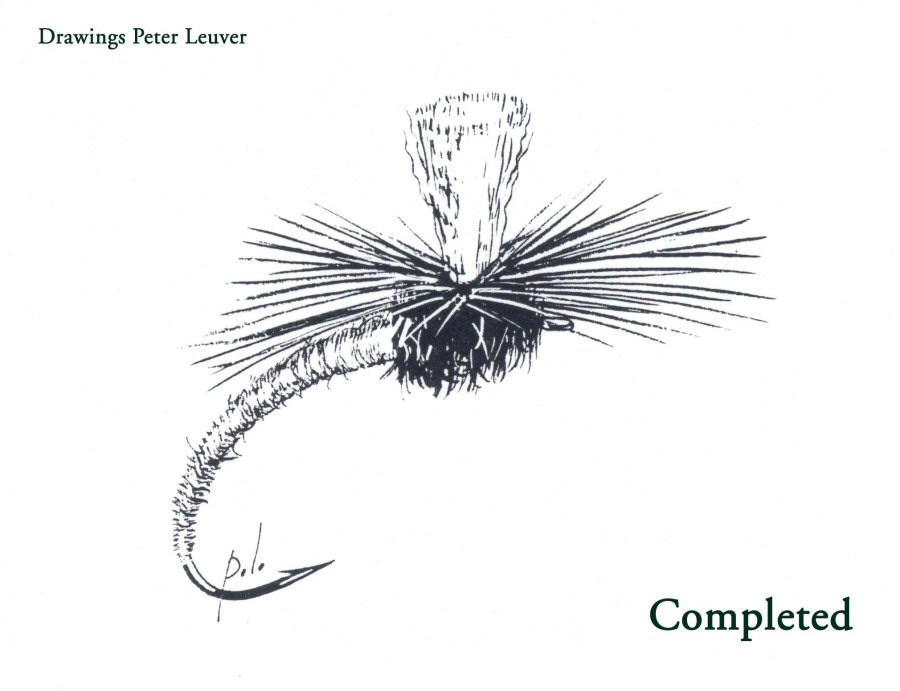
Drawing credits Peter Leuver.